
Hello, Marcia here with a handmade rose tutorial for you today. I love making my own paper embellishments for a number of reasons; its cheaper, the roses I make are more realistic, and I can make them in any color I want to match my project. So today, I am going to show you how to make the roses that I used for the Black and White with a Kiss of Color challenge.

You will need the Spellbinders Rose Creations dies (or a similar cut using a cricut cartridge), cardstock, ink, any color brad, and some glue. Using the 4 smallest Spellbinders Rose Creations dies , cut 1 each of the smallest 3 dies and 2 of the next largest die.

Apply ink to the centers of the flowers and ink the smallest flower entirely. I also apply some ink to the petal edges on the back side of the smallest flower. I used Quick Quotes Powder Puff chalk ink and applied the ink with a dauber.

Spritz the flowers with just a little bit of water. This will make them more pliable. You want the paper to be damp, but not drenched.

Take the smallest flower and with the inked side down, roll the edges of the petals up. This will be used to make the bud.

With the larger flowers, place your thumb in the middle of the flower and gently roll the edges of the petals under. The larger flowers should look like this when you are done.

Place a brad (any color will do as it will not be seen) into the center hole of the smallest die and gently fold alternating petals up.

Holding the bud, assemble the rose by adding the shaped flowers from smallest to largest onto the brad. Bend the prongs of the brad open to keep the rose assembled. Twist the flower layers to alternate the petals. Apply some fast drying glue to the inside of the bud and once again gently fold the alternating petals up. (I have tried gluing the bud before assembling the rose, but when I open up the brad prongs I usually end up crushing it)

I apply the finished roses to my layout with a glue dot. The smaller roses on my layout can be made the same way, leaving off the 2 larger flower die cuts.

Now, here is a Valentine version you can make.

You will need: Hershey kisses, floral tape, floral picks, red or pink saran wrap cut into a small square, cardstock, and Spellbinders Rose Creations dies.
Using the 2 largest Spellbinders Rose Creations dies, cut 2 of each. Using the same method as above, shape the petals of the flowers.

Stick the floral pick into the bottom of the Hershey Kiss. If you want to be able to eat the chocolate later, apply 2 layers of foam tape together, stick the floral pick through the foam tape and then adhere the foam tape to the bottom of the Hershey Kiss.
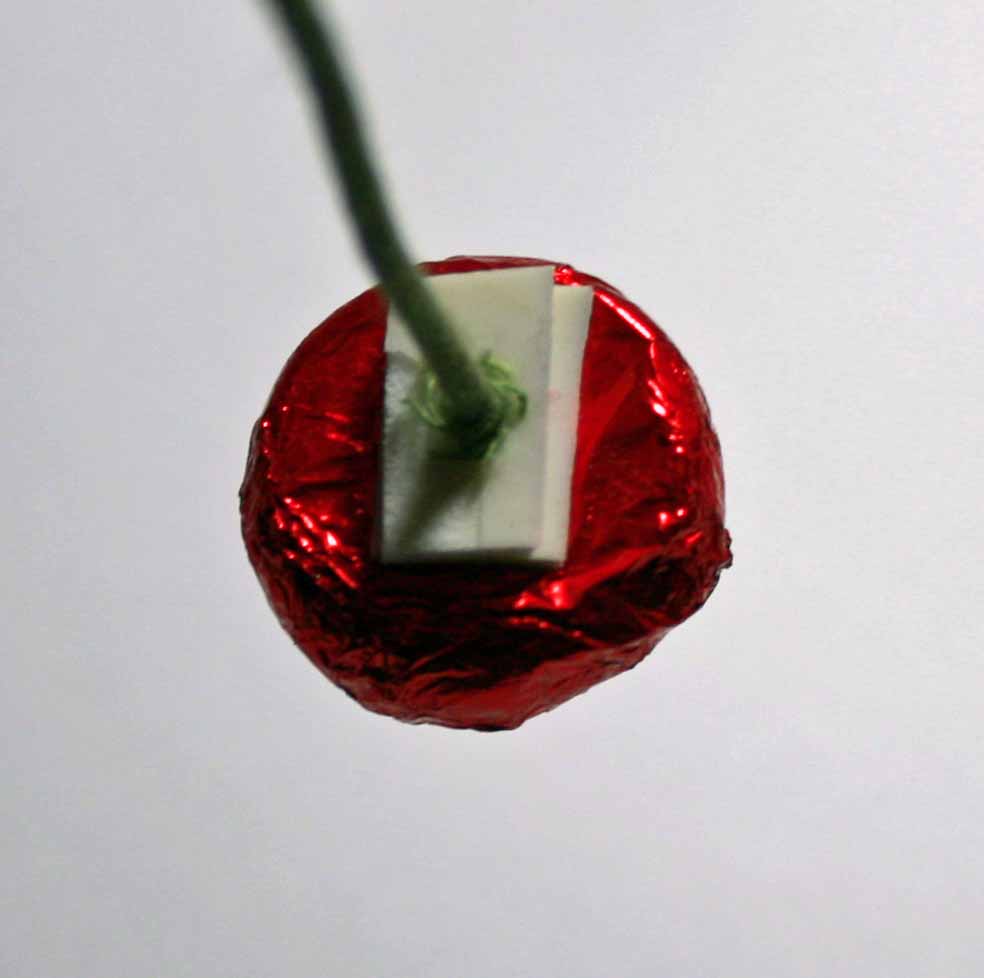
Place the saran wrap on top of the Kiss and twist underneath. Apply the floral tape on the pick over the saran wrap and continue wrapping it down the floral pick to cover the saran wrap.

Add the shaped flowers from smallest to largest. Add some more floral tape underneath the flowers to keep them from sliding back down the pick.

Cut one large leaf using the Spellbinders Rose Creations die. Score it down the middle and curl one edge around the floral pick.

Taking a piece of floral tape, attach the leaf to the pick by wrapping the floral tape around the pick above and below the leaf.

Slightly bend the floral pick so the rose is not straight up, but as it would look if it were a real rose in a vase. Arrange a few roses in a vase with some silk greens or gift it as a single rose.


Very cool!
ReplyDelete- April
wow beautiful made, great tutorial.
ReplyDeletegreetings karin
Oh my gosh! The hershey kiss centerpiece is fantastic! I have to try this!
ReplyDeleteAbsolutely grogeous flowers! Love the pink ones!
ReplyDeleteI have the Spellbinders Rose dies and your wonderful step instructions are just what I needed to be able to try this. Thanks for sharing.
ReplyDeleteMelissa
"Sunshine HoneyBee"
http://CreatedbySunshineHoneyBee.blogspot.com